Upon completion of a transaction, you will advance to the Fee Settlement screen creating a Cart. The cart displays the transactions you have processed, as well as what is owed by this customer. If you have further transactions for this customer, you can click on the Module Icon to process the next transaction. After each transaction, you will advance to Fee Settlement.
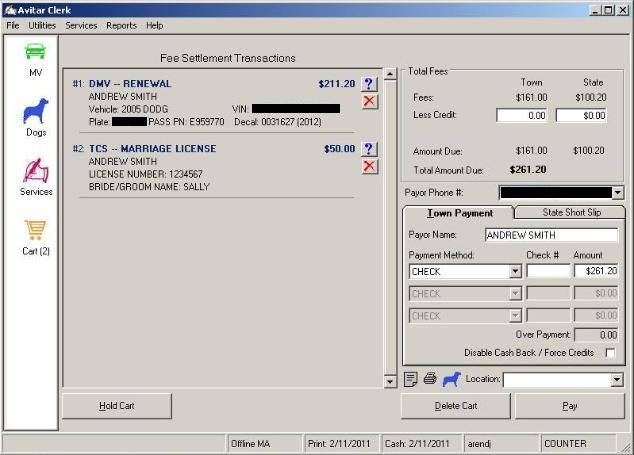
To view the details of an individual transaction, click the “?” next to that transaction. Depending on the type of transaction, certain information may be edited from this screen. For example, you can edit a dog tag number or rabies information, but you are not allowed to change any information regarding a motor vehicle. If a motor vehicle's information is incorrect, you would have to delete the transaction (see Deleting at Fee Settlement ) and start over.
In order to assist with the licensing of dogs, if the owner you process a transaction for has an unlicensed dog, a blue dog icon will display on the Fee Settlement screen next to the Location text box. If you see the blue dog icon, you can remind your customer that they need to license their dog.
As each transaction is added to the cart, the total amount owed is displayed under the Total Fees section. If the customer wants to see a detailed transaction summary for each item in the cart before they pay the fees, click on the printer icon located below the payment section. This will display a report that can be printed and reviewed by your customer.
Once you have completed all the transactions for this customer, you need to select the payment method(s) and enter the payment amount(s).
A few notes:
- Depending on your systems settings, the amounts on the payment tabs can be configured to auto-populate the Amount text box (see Town Settings Tab), thereby eliminating the process of entering the amounts and the possibility of entering the amount incorrectly.
- The system will auto-populate the Payor Name text box with the Owner's name. If the person paying is different, enter the information into the text box.
- The payment tabs will display differently if you are a “one-check” town versus a “two-check” town. In a two-check environment, you will see a Town Payment tab and a State Payment tab. In a one-check environment you will see a Town Payment tab and a State Short Slip tab.
To enter the payment(s), use the Payment Method dropdown box on the Town Payment tab to select how the customer has paid: cash, check, ACH, credit, etc.). If you processed a transaction with a State fee and you are in a two-check environment, you will need to select the State Payment tab and follow the same instructions. Note, if you are accepting Credit Card and ACH payment tenders, you will need to contact Avitar in order to enable this feature. To complete the process, click Pay.